
Merge Project Changes
View changes and resolve conflicts to merge two revisions or projects.
Overview
Multi-user collaboration and individual work in multiple projects can result in conflicts between changes made to the same object and the creation of new design objects. This can happen while you're making changes in a project and another collaborator commits their changes as a new revision or another user releases a new production version of the solution. Before you can commit your changes as a revision or publish a project, you'll have to update your project so it's based on the latest version. The solution will automatically merge your changes with changes in the latest project revision or production version. If there are merge conflicts, you'll be prompted to review all conflicts and select which changes to keep in the merge tool. After you update to the latest version, we recommend that you review your changes and ensure they work as expected, especially those made to solution security.
Tip:
- To avoid merge conflicts and duplication of work, we recommend that you don't make changes in the same areas of the solution simultaneously in two different projects.
- For more information on how to resolve the most common merge conflicts, see Common Merge Conflicts.
Update a project
If you see the Update to Latest option in the Changes tab of the project home, then you're no longer making changes on the latest revision of the project or the production version of the solution. To continue making changes, you can update your project by clicking the Update to Latest button and resolving any conflicting changes.
You'll be prompted to update your project when:
- Committing changes based on an outdated revision of the project.
- Publishing a project based on an outdated release version.
Merge projects
Combine changes from another project into your current project.
Prerequisites:
- The destination project, which is the project you want to copy changes into, must contain a revision.
-
If you're not the owner of the project, you must have the Edit or Share permission to perform the following tasks.
- Open the destination project.
-
In a project, on the navigation bar, click the Home button
 .
.
- Click the More button
 > Merge Into This Project in the upper-right corner of the project home.
 - In the Merge Into This Project dialog, select the project you want to merge changes from.
- Click Merge.
Result: The solution will process and combine the changes. This may take some time.
- Optional: Use the merge tool to review the merge results or resolve conflicting changes.
- To finalize the merge, click Complete Merge.
Resolve project conflicts
Tip:
- Contact Visier Technical Support if you need help or guidance understanding how to resolve merge conflicts.
- For more information on how to resolve the most common merge conflicts, see Common Merge Conflicts.
The merge tool allows you to review the differences between two revisions or projects and select which changes to keep. The merge tool displays changes at a per-field granularity level. This means that you can review multiple changes to one object by the particular fields that were changed, such as a formula strings or dimension members. This allows you to select aspects in different fields from both versions to create a revision or project which reflects changes from multiple versions accurately.
The merge tool layout follows the industry standard for conflict resolution tools, as shown in the following screenshot.
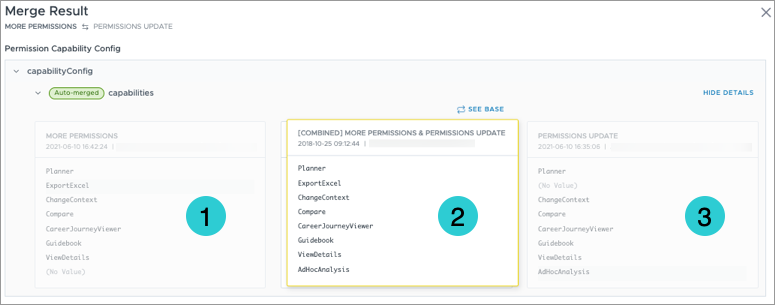
- Changes in this version: Changes for the revision or project that you're working in.
- Original values: Changes for the common ancestor of both versions.
- Changes in other version: Changes for the revision or project that you're trying to merge with.
The merge tool highlights non-conflicting changes in yellow, conflicting changes in red, and resolved items in green.
Tip: If non-conflicting changes to the same field of an object are automatically combined, you can click See Base/See Combined above the middle panel in the merge tool to view the common ancestor of both versions or the combined result from both versions.
Merge non-conflicting changes
Any changes that do not conflict will automatically be merged. When non-conflicting changes are made to the same field of an object, the changes are automatically combined by the application. This occurs when the following conditions are met:
- The object is a collection. A collection contains multiple items, such as the capabilities list in a permission.
- The collection is not order-sensitive. Order-sensitive collections can be reordered, like the list of guidebooks or properties in the Detailed View visual.
- The elements within the collection are uneditable. Uneditable in this context means the element can only be toggled on or off, like turning on a capability in a permission.
Note: Changes to security filters and content packages are not automatically combined.
Example: Merge non-conflicting changes
An organization's solution contains a metric named Turnover. Collaborator A determines this isn't the best name for it and creates a project to relabel Turnover to Exit. Collaborator B has also done some metric relabelling in a separate project. Collaborator A and Collaborator B find out that they are doing similar tasks and decide to collaborate on the effort to relabel metrics by merging their projects together.
When Collaborator A attempts to merge the two projects together, the solution automatically merges the change to the Turnover metric because Collaborator B did not change this metric. However, Collaborator A can choose to keep or discard this change when reviewing the merge results.
Example: Combining non-conflicting changes to the same field of an object
An organization has the permission Business Unit Leader. Collaborator A decides that this permission should contain the capability Create Captures & Analyses and creates a project to do so. In a separate project, Collaborator B sees the same permission and decides it should contain the capability Export to Excel. Collaborator A and Collaborator B merge their projects together to combine their permission updates.
When Collaborator A merges the two projects together, the application automatically combines the changes to the permission Business Unit Leader because they do not conflict with each other. Collaborator A has the option to view the results in the merge tool, or complete the merge.
Merge conflicting changes
Merge conflicts generally arise when two users have made overlapping changes to the same object or if one user deleted an object while another user was modifying it. When conflicting changes occur, you must select which change to keep. If multiple conflicting changes are made to the same object in both projects, you can select which changes to keep from either version. For example, if overlapping changes are made to the display name and description of an object, you can keep the display name from one project and the description from the other project.
Example:
An organization's solution contains a metric named Turnover. Collaborator A determines this isn't the best name for it and creates a project to relabel Turnover to Exit. Collaborator B also thinks Turnover should be renamed and in a separate project relabels Turnover to Attrition. Collaborator A and Collaborator B find out that they both have the same concerns and decide to collaborate on the effort to relabel the Turnover metric by merging their projects together.
When Collaborator A attempts to merge the two projects together, a merge conflict surfaces because the solution does not know whether the Turnover metric should be labeled Exit or Attrition and asks Collaborator A to make a choice: change Turnover to Exit or Attrition?
Collaborator A and Collaborator B discuss and decide that Exit would be a better name. Collaborator A chooses to accept the change to relabel Turnover to Exit and the merge conflict is resolved.
In this section